Archive for category Projects
A simple traffic simulator
Several years ago, while shopping in Target, I was thinking about making a simple traffic simulator. I’m not entirely sure what sparked the idea — I think at the time, I was interested in the effect that a few bad (or slow) drivers could have on traffic. Or maybe it was about how long it took for a traffic slow-down to clear up.
Anyway, when I was thinking of things to work on over this past Christmas break, this was one of the ideas that resurfaced. So I decided to poke around with it. Given that I forgot why I wanted to do it in the first place, I should have known it was going to be hard to decide on a reasonable end state for the project–and no I didn’t look to see what was out there.
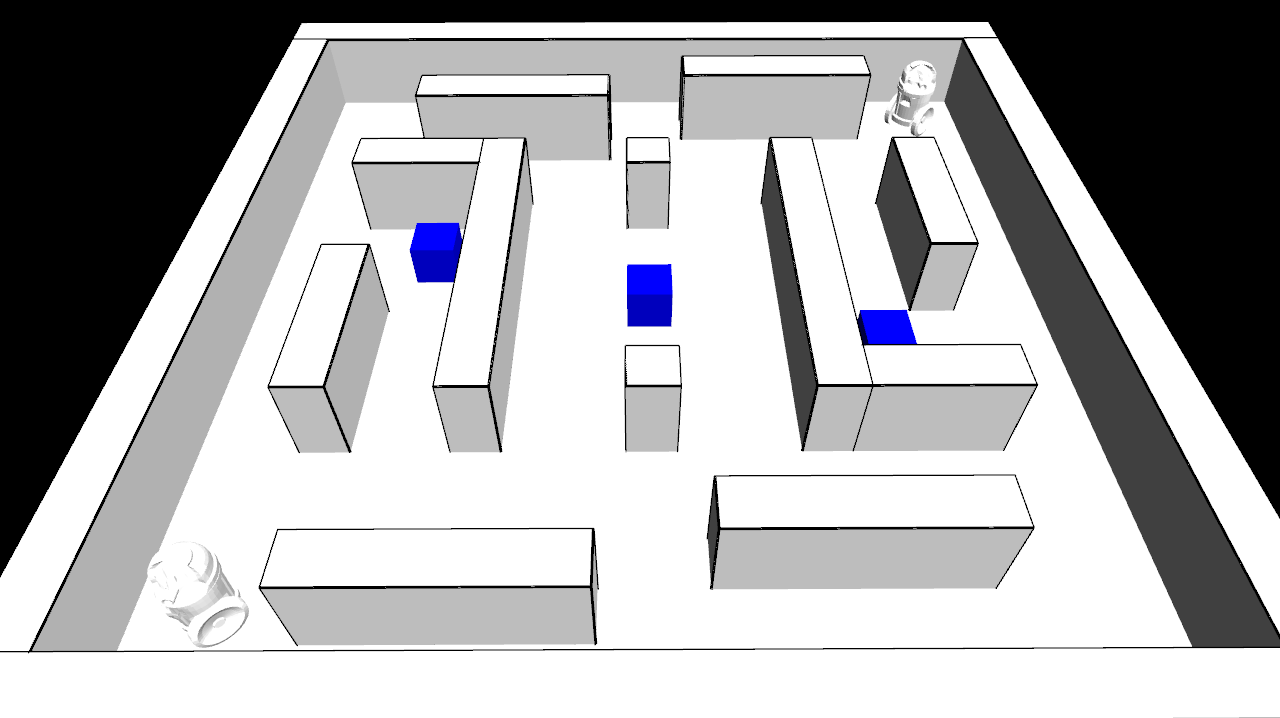
I guess I got the simulator to the point where cars sped up, slowed down for other cars, slowed down for intersections (and corners), and randomly plotted their path (using updating estimates of speed for each of the road segments). I didn’t spend all that much time on the visualization, so it doesn’t look that great. Here’s a rendering, with some annotations below:
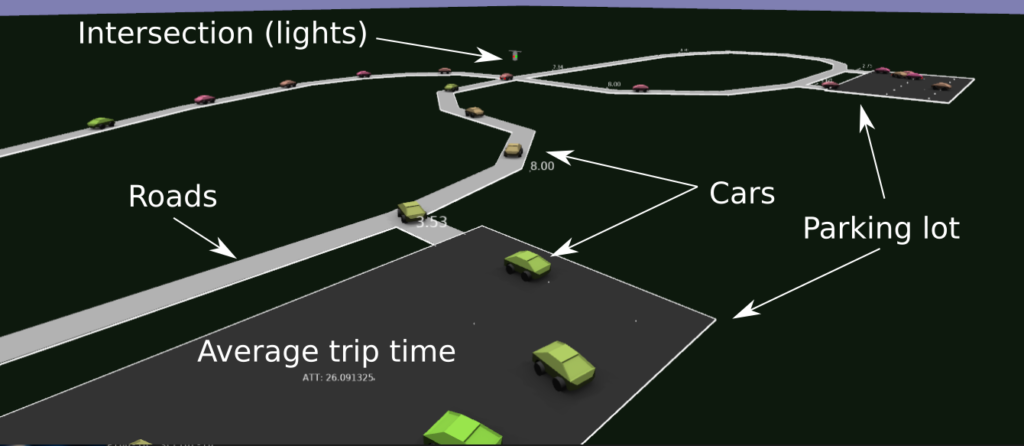
Overall, I guess there were some fun little problems to solve: like how to deal with intersections, implementing the smooth interpolation around corners, determining when to slow down, trying to make things more efficient, etc..
As usual, the level editor is in Blender, and it was kind of fun just setting up new levels (adding new roads, intersections, etc.) and watching the simulation to see what happened (when cars cut each other off, how it slows down traffic, and when cars start taking long routes due to traffic on shorter ones). Felt a bit like adult Lego.
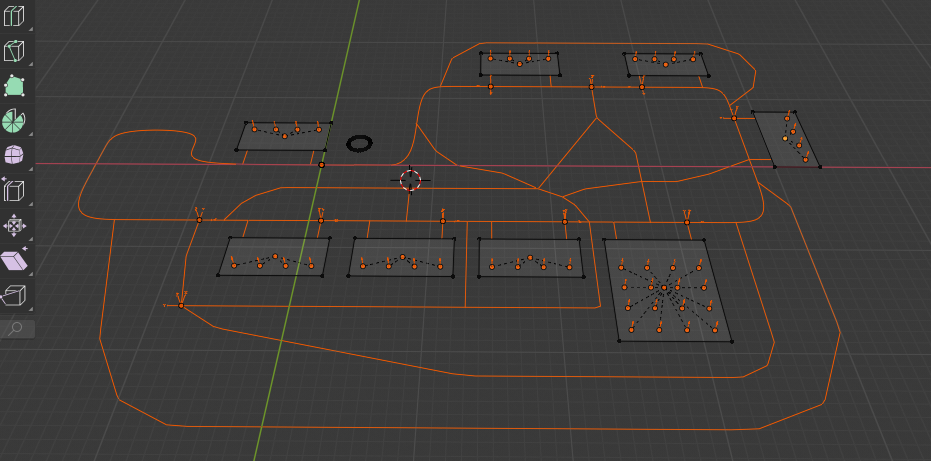

I spent a bit of time optimizing the simulation, so I think it could simulate about 50K cars (in a single thread)…although I only ever added 1k cars.
Anyway, most of the features of the simulation plus some actual renderings from the simulator are in the following video (use the chapter annotations see interesting points)
Source code and some more details about the project here:https://github.com/nbirkbeck/dsim
Scrabble in a car…well almost
Every time I visit my folks at their cabin we end up playing some rounds of scrabble. We allow the use of some aids, e.g., online tools that help find all words that that consist of a set of letters. Since we usually drive up to visit them (usually takes about 16 hours, usually split across 2 days), I’m always looking for some toy problem to work on in the car. On the last trip back, I figured I would write a scrabble word placement helper that find the maximum move given the set of letters. I didn’t finish this on the last visit, but had a skeleton of the solver (but my lookup was slow).
This past Christmas, I decided to revive that project, and ended up with a much more clean and efficient implementation. It’s obviously a pain to input the status of a game without a user-interface, so I whipped up a quick barebones UI (and server) that allowed playing from the game from the start.
With that, it’s easy to pit a few of these optimal players against each other. They have no actual strategy, though, beyond trying to maximize the score that you could get with the letters on hand.
More info and details along with the code here: https://github.com/nbirkbeck/scrablve
Here’s an example of two of the auto-players playing against each other:
Playing around with Reinforcement Learning
While playing a video game (I believe Mafia 3, from previous Christmas, I believe), I had started to think about what a “fun” AI to play against would look like. I got excited about trying to spend some time learning a bit about this space, using a restricted/simpler game environment.
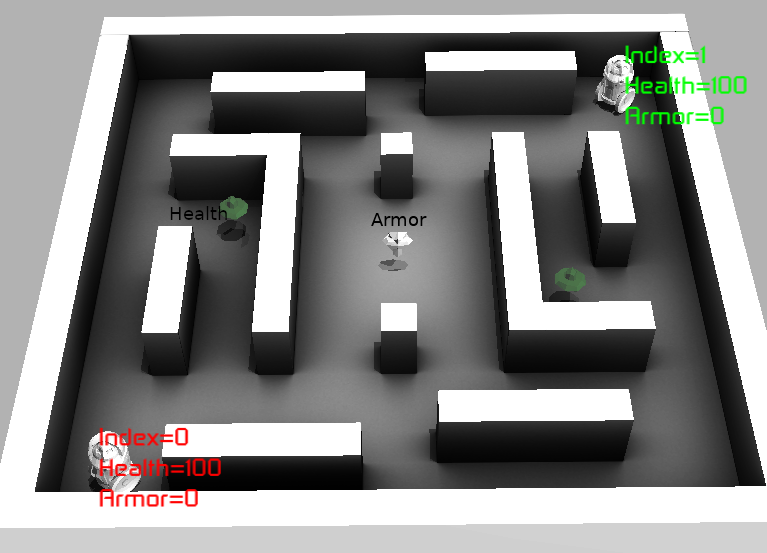
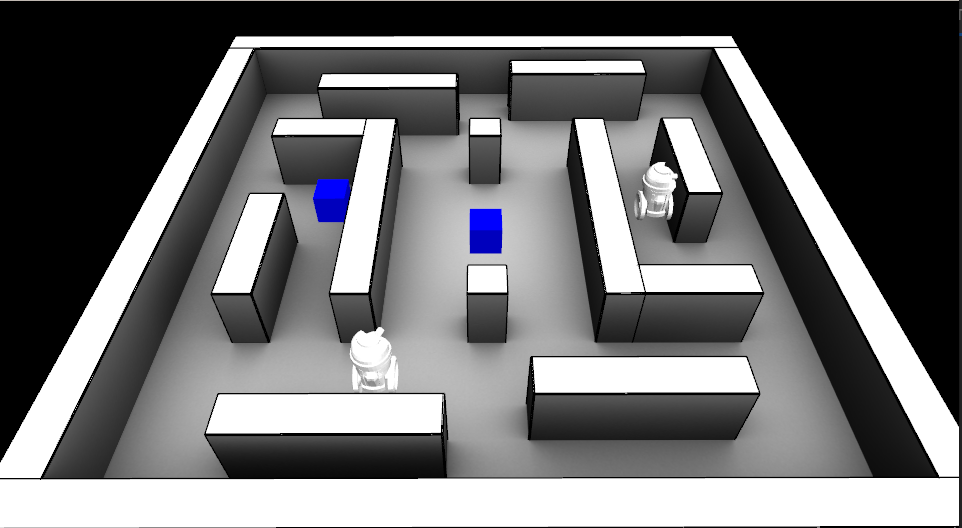
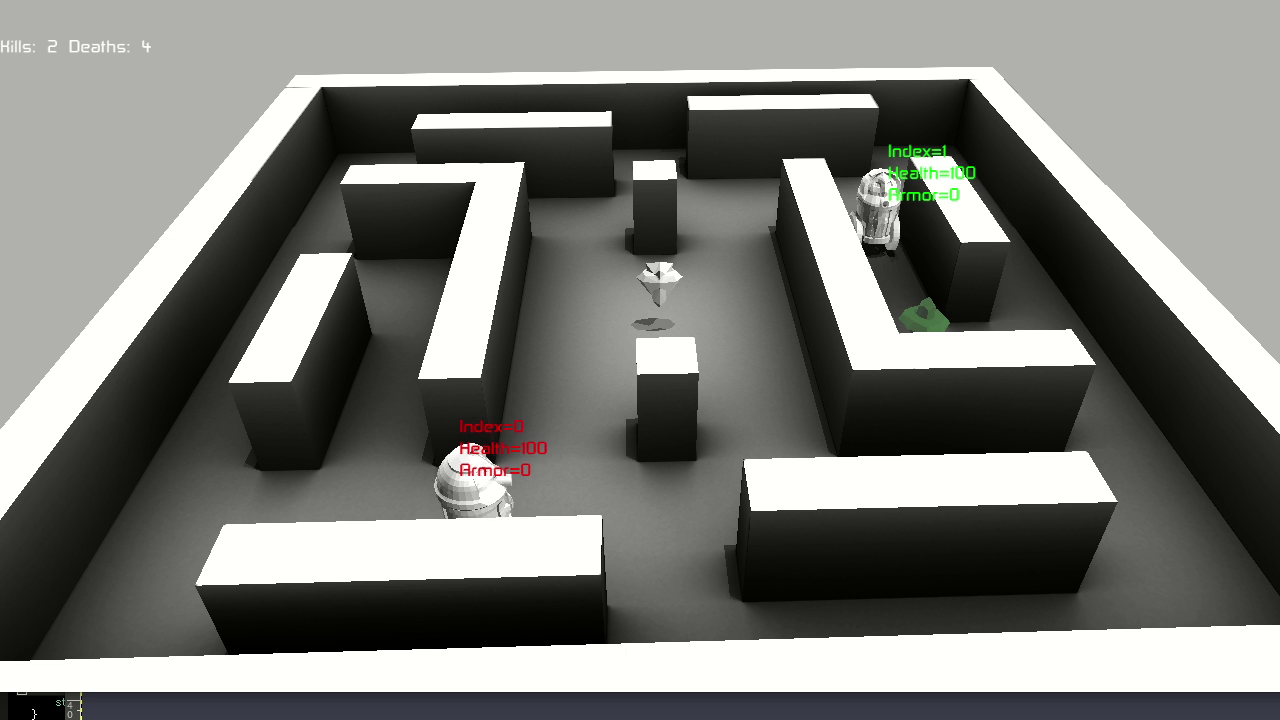
I decided that a simulation environment for a stripped down version of a 1st-person shooter game (mostly happening in 2D) would be sufficient. Agents can move around the environment and the objective is to shoot the opponent. The bullets look like little arrows and do a certain amount of damage (armor limits the damage).
Like Quake III (one of my all-time favorite games), there are some power-ups (health and armor). Controlling power-ups is necessary to be successful in this death-match game (first to hit a certain number of kills in a given time frame).
Simulation Libraries
The environment (world) and core actions of the agents are written in C++, where the agent gets observations from the world and returns a set of desired actions. Actions are carried out by the world, using proto-buffers for communication. This was mostly since I was designing this before thinking about how I would be interfacing with RL libraries.
In the end, I found that stable_baselines3 seemed like a reasonable RL python library, so I just had to adapt the python wrappers of the c++ core to expose what was necessary there.
So proto for data that needed to be serialized, bazel for build, gtest for testing (there aren’t many), stable baselines3 (for RL), and eventually Ogre and Blender cycles for rendering (see below).
Some example YouTube videos:
- Playing the game (1st person) against one of the agents: https://youtu.be/Dz061aS6qgM
- An example using the old (non-OGRE) rendering: https://youtu.be/h6Pw6QfVRgc
Code available: https://github.com/nbirkbeck/battle-ai
Agent Training using Reinforcement Learning
After a day or so of getting an environment ready, and then a bit more time integrating into an RL environment. I remember being slightly disappointed with the results. I think this was me being naive in terms of the amount of effort involved in tuning parameters / debugging models to get an agent to learn anything.
Finding power-ups
I had to dial things back to try to get an agent capable of even finding powerups. In that simpler environment, reward is proportional to the health or armor that the agent picks up, and actions are movement in one of 4 directions. Eventually, the agent did find a reasonable strategy to pick up items in a loop (but still missed finding one of the other health items that could have been more optimal). Likely, if I had better knowledge of the training algorithms / parameters / back-magic involved in tuning them, I could have found them.
Example: The agent starts out in the left of the video and does learn to pick up the health (middle left), and then go to the center (to get the armor). The agent then repeats this pattern.

There is also an example video here:: https://youtu.be/TCylBJaad6E
Higher-level actions
Seeing how long it took to get the agent to solve the simpler task of finding power-ups, and given I was interested in learning high-level strategies, I created the skeleton of a “plan-following” agent. This agent is parameterized in terms of behaviors (like go to a health or armor powerup, move towards the shortest path to a visible opponent, or move left, right, away from the opponent). The agent senses how far away from the items it is, as well as how far away from the opponent, it’s health/armor, etc.
I really wasn’t sure how to setup the parameters for the learning algorithms and just adapted them from other games (like the atari games). After several trials, I started adding more complexity in the rewards (e.g., reward for not standing still, for not hitting a wall, for getting health and powerups, as well as for killing the opponent, and negative reward for being killed). This just introduced more parameters that it wasn’t clear how to tune.
After some time of back-tracking my approach, just using a simple reward of “1” for killing the opponent seemed more desirable–given that really is all that matters in the end. After playing around with the training schedule and increasing the number of iterations, training loss was decreasing and the agent was doing better. Example: https://youtu.be/adXGj-8ppU0. But the agent still seemed “dumb”, e.g., it was avoiding going to nearby powerups when health was low. And the agent wasn’t better than the hard-coded agent I wrote in a few hours to bootstrap the training process (and to test out the planning).
After several more attempts, each training for about 1.5 days (20 Million steps) with various parameters, things weren’t getting significantly better. Ultimately, the best I got was by penalizing all of the left, right, forward, back actions in favor or just going for powerups. The agent could at least hold its own against the opponent it had been learning against:
Example video: https://www.youtube.com/watch?v=MYxv-7oNm38
In the end, during the process, I realized that my initial motivation to work on this problem was about a “fun” agent to play against. Training an agent to be good at the task was likely to not be a fun opponent to play against. I guess I got out of the project what I had intended, but like any other of these projects there are many fun digressions along the way.
Interesting Digressions
Either when training agents (and waiting for things to happen) or just looking for other things to clean-up before finalizing the project, there are always some interesting findings along the way.
Pyclif vs other wrappers
In previous projects (years ago), I had used Swig (http://www.swig.org) for creating python wrappers of my c++ code. And since I was using QT for many UI’s at the time, I ended up switching my personal libraries to SIP. I look fondly back on writing custom implementations for accessors with SIP as it gave some visibility on the raw python C API.
Another similar utility is CLIF (https://google.github.io/clif/), which I initially tried to use with this project. But for reasons that I can’t recall, I either couldn’t get it to work – or couldn’t get it working easily with Bazel (which was what I’d chosen to use for the build system).
However, in the process I came across Pybind (https://pybind11.readthedocs.io/en/stable/) as an alternative. And I ended up loving it. It is trivial to create the mappings, the code is all c++ (instead of a domain specific language), and the custom implementations (say for accessors) can be concisely written with lambdas in c++.
For example, I have an image class that I have been using for more than a decade that primarily uses operator overloading for accessors. When simply trying to export a heatmap for the examples above, dealing with the image libraries (e.g., PIL) for floating point RGB turned out to be painful to figure out in minutes. Since I already needed python wrappers for the Agent and World, it was easy enough to export the image interfaces, which were already being used in this project. Adding custom code (using set instead of operator) was easily accomplished with the following wrapper:
  py::class_(m, "Image8")
    .def(py::init<int, int, int>())
    .def("width", &Image8::getWidth)
    .def("height", &Image8::getHeight)
    .def("set", [](Image8& image, int x, int y, int c, int v) {
       image(x, y, c) = v;
    })
    .def("resize", &Image8::resize)
    .def("save", &Image8::save);
Blender Cycles Render For Ambient Occlusion
I really wanted to automate a somewhat decent rendering from a simple box-based specification of the world. Simple materials with ambient-occlusion in Blender seemed good enough, but the steps required to do it (and make sure it was synchronized with all the geometry) was a bit of a pain. Likely possible to whip some scripts up in blender directly, but since Blender was using Cycles under the hood maybe it was just as easy to use Cycles directly to bake in some ambient occlusion directly from the level specification.
Where things went wrong:
- I only ended up making one or two levels, so probably wouldn’t have been too much work to do this manually for those few cases
- After hacking up a simple visualization, I really didn’t want to get too distracted with graphics (or animations) – so I ended up searching for a rendering engine to use. I just decided to use Ogre, mostly because it was available and I’d heard of it before.
So the sequence of steps for creating a level is something like:
- Create the boxes in blender
- Export the proto representation of the world and a concatenated mesh representation
- Create the geometry and use cycles to do the ambient occlusion
- Load the geometry into blender so that it can be exported (and converted) to an appropriate Ogre form
Obviously, that could be simplified, but whatever.
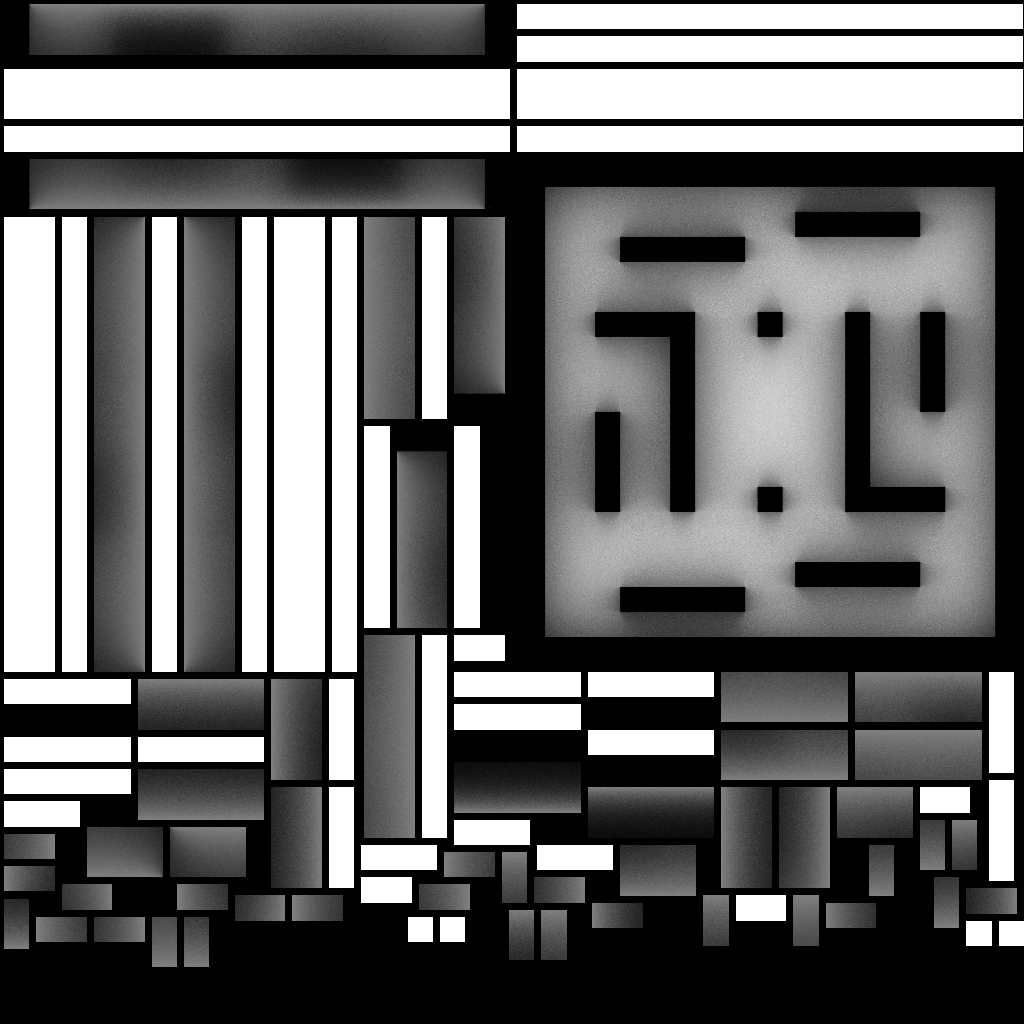
Resulting ambient occlusion map given below. With the example on the left being a handy trick I use all the time to rasterize barycentric coordinates of my triangles in the texture map.

Ogre for rendering
Some rough visualization was necessary, so I had just whipped up a quick visualization using some of the old libraries from my grad school days. But I still wanted it to look decent (hence the ambient occlusion digression), but when I was thinking about adding shadow, materials or animations, it seemed wasteful to do that without some other libraries.
I ended up using Ogre for this. Overall, this was a fairly painless transition, although I do remember the export and conversion of animations from blender to be a bit painful and required some time. Similarly for adding text.
Without ambient occlusion
Default interface (with ambient occlusion):
Ogre interface:
Checkout the videos instead:
- Ogre interface: https://youtu.be/MYxv-7oNm38
- Simple interface: https://youtu.be/h6Pw6QfVRgc
And with that, I think I’ve almost cleared my slate for this year’s christmas project (still TBD if at all…)
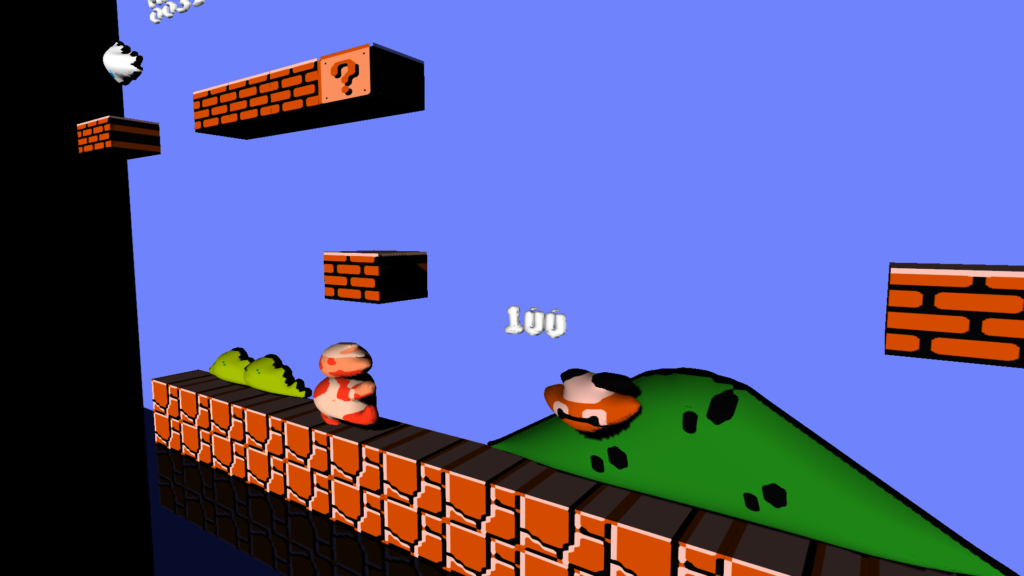
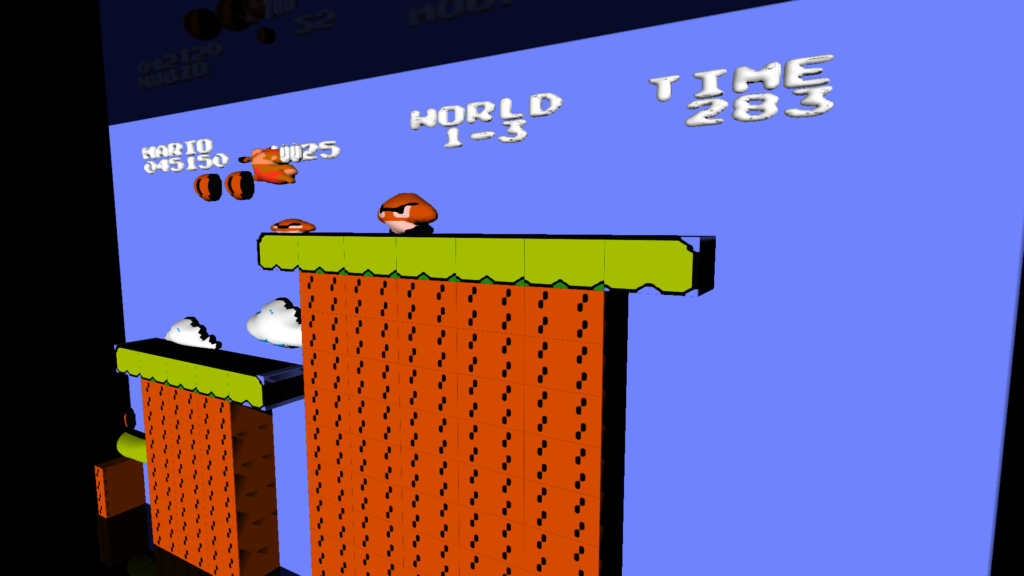
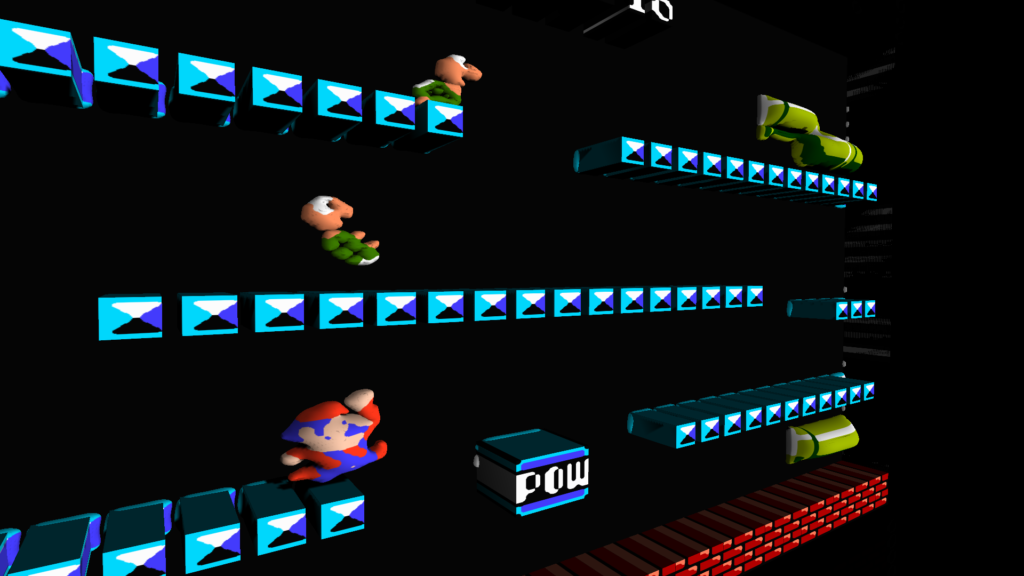
3D NES Emulator Renderer
A long time ago (sometime as an undergrad) I wrote a NES emulator (http://www.neilbirkbeck.com/?p=1054)
For some time, I’ve wanted to take either the rendered frames, or some game state and try to make a more appealing rendering of emulated games. I did finally get a chance to spend some time on this over the previous Christmas break. However, despite my best intentions of producing something that looked photo-realistic, it simply wasn’t practical to do in 4-5 days. I figure it is interesting enough to post what I ended up with here anyway.
The source code and some more details here (https://github.com/nbirkbeck/ennes). Although, the actual implementation depends on a bunch of my internal libraries (nimage, nmath, levset, and a bunch of other code from my PhD). At one point, I was tempted to use ideas similar to (http://www.neilbirkbeck.com/?p=1852) to try and get nice silhouettes for the upsampled images.
Here’s an example rendered video:
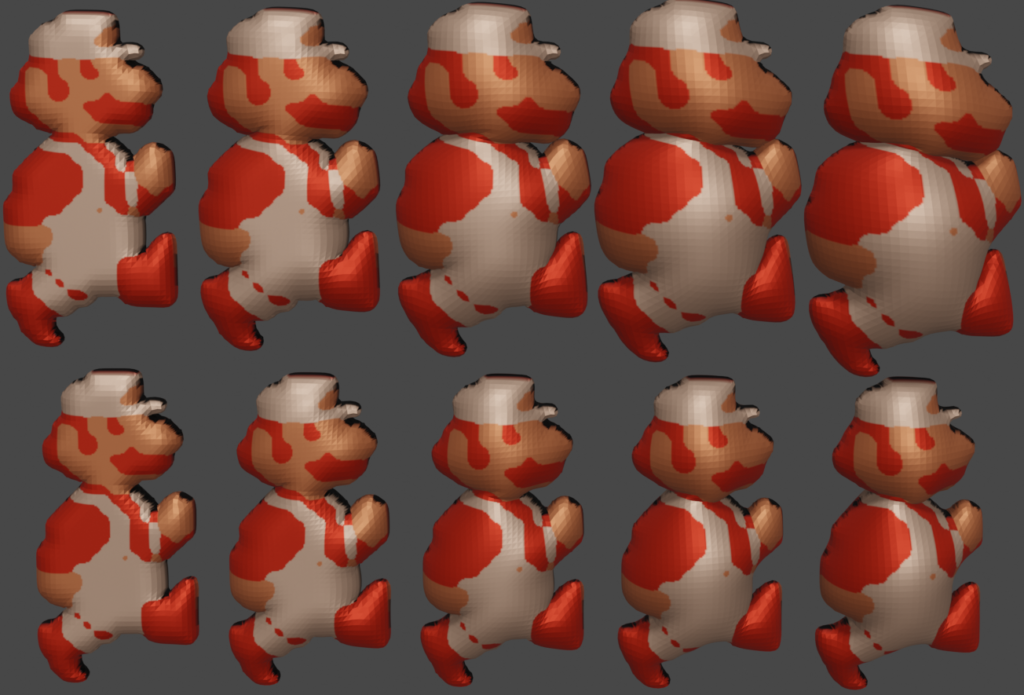
What I ended up doing was extracting the game state from the emulator, grouping sprites (based on colors), upsampling the images, producing a silhouette, and using those to extrude 3D geometries. For the most part, there is a cache that maps an sprite group to a corresponding 3D model. More details in the README.md on github. And there are a few hacks specific to super mario1 (which was mostly what I was thinking about when I started working on this).
Some examples of the puffed-up geometries:
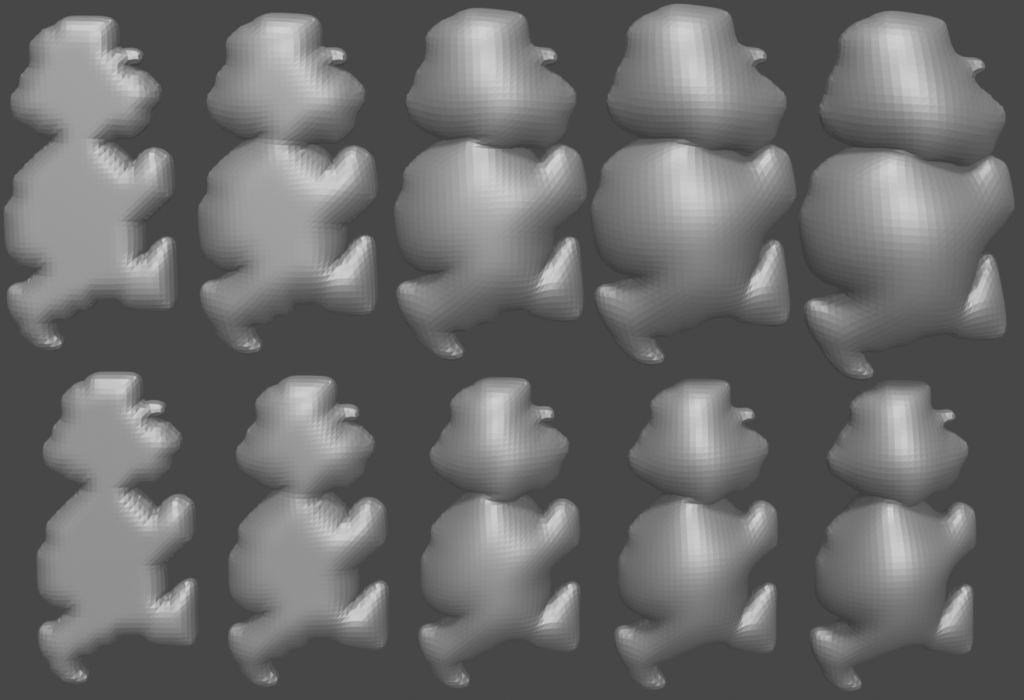
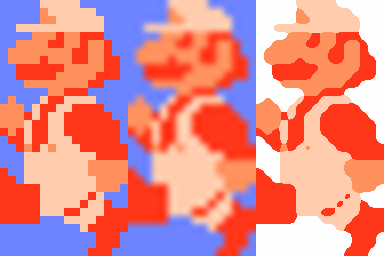
The following image (right) illustrates the upsampling used. (Left is nearest, and middle is image magick’s default)
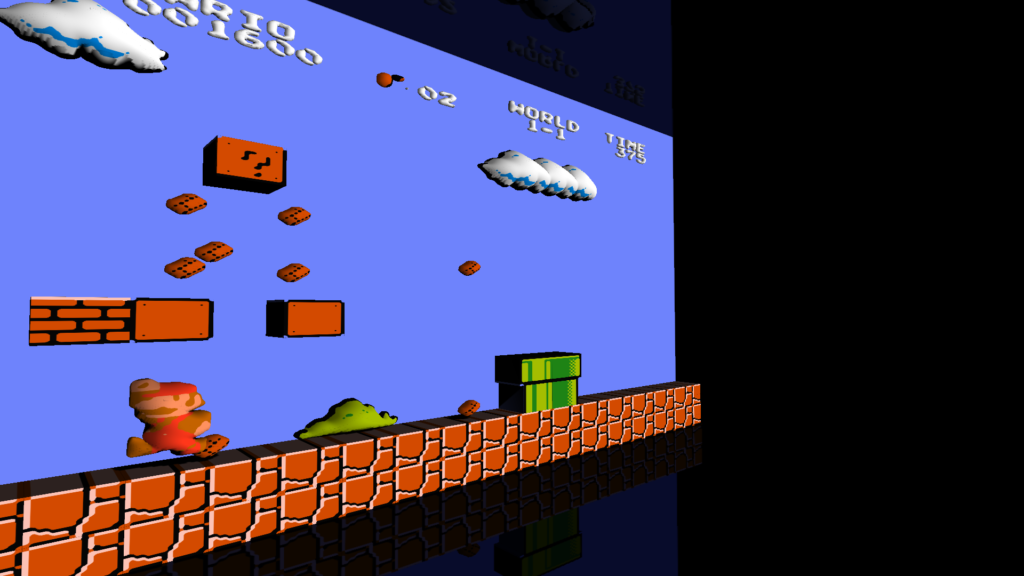
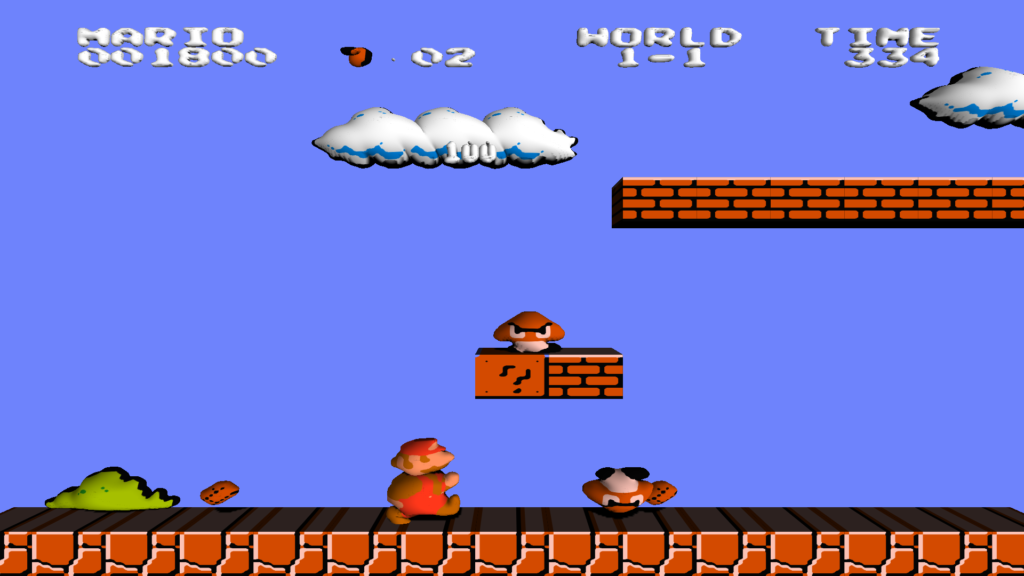
And some screenshots (mostly from smb1):
One other noteworthy thing was just how bad the code was from the old emulator. For example, in rendering from the pattern table, there would be something like the following. And then there would be multiple versions of that code for the various options available for flipping the pattern (horizontally and vertically)
inline void drawByteBuf(int x,uint index,uint uppercolor,uint palette, int inc=1)
{
RGB_PE pe;
uint temp,temp2;
uint cindex;
uppercolor=(uppercolor<<2)|palette; temp = fetchMemory(&(g_ppu->memory),index);
temp2 = fetchMemory(&(g_ppu->memory),index+8);
cindex= ((temp>>7))| (0x2 & (temp2>>6));
if(cindex){
layer0[x]=uppercolor|cindex;
layer1[x]+=inc;
}
cindex= (0x1 &(temp>>6))| (0x2 & (temp2>>5));
if(cindex){
layer0[x+1]=uppercolor|cindex;
layer1[x+1]+=inc;
}
cindex= (0x1 &(temp>>5))| (0x2 & (temp2>>4));
if(cindex){
layer0[x+2]=uppercolor|cindex;
layer1[x+2]+=inc;
}
...
}
Contrast that to how simple a more comprehensive routine could be in the newer render_util.cc
Soko solve
Programming is a fun way to pass time.
A few years ago, I was playing lots of sokoban (or box pusher). Around the same time, I was also conducting a number of technical interviews, so was often thinking about self contained programming problems. Back as a grad student, in a single agent search class, we learned about searching with pattern databases–basically you solve an abstraction of the problem and use the solution length in that space to build up a heuristic (see this paper Additive Pattern Database Heuristics).
I’m sure there is plenty of research on the actual topic for sokoban, but I was interested in poking around the problem we were driving to Canada from California for a holiday.
The source code is up on github here:
https://github.com/nbirkbeck/soko-solve
And you can check out the demo (included in iframe below):
http://neilbirkbeck.com/soko-solve/
You can play the levels with ‘a’, ‘s’, ‘w’, ‘d’. Or you can click “solve” and “move” through the optimal path. The “Solve all” will benchmark a bunch of different methods. There is a much more detailed description of my analysis in these notes:
https://raw.githubusercontent.com/nbirkbeck/soko-solve/master/NOTES
Javascript & WebGL Image-based rendering demo
Back when I first started doing grad studies at the U of A, I worked with some others on image-based modeling and rendering (http://webdocs.cs.ualberta.ca/~vis/ibmr/rweb.php?target=main). Back then we had very specific renderers for the latest and greatest hardware (Keith Y. was the author of these), and I had worked a bit on a wxWidgets cross platform version of the renderer and the capture system.
The file format was a binary IFF-type format that could be used to stream partial models. Internally, look-up tables and texture basis images were represented either raw or in Jpeg. I originally just wanted to use emscripten to port that version to javascript, but kind of got discouraged after seeing some of the work that would have had to been done to the no-longer maintained renderer source, which had inline assembly and used ancient GL extensions, and I wasn’t sure what was required to interface with dependent libraries (like libz). Turns out you can natively do all of the necessary binary file unpacking (and jpeg/raw image decompression) to get things loaded into WebGL textures. Admittedly, some of these things are not as direct as they would be if you were calling say libjpeg to decompress, but interesting nonetheless. So here is a WebGL version of the renderer:
http://js-ibmr-renderer.appspot.com
that has almost all the same functionality as the desktop app (doesn’t do the 2D or cube-map look-up tables, and doesn’t support some of the older file formats). Should work with anything that has a decent graphics card and a browser that supports WebGL.
Source code: https://github.com/nbirkbeck/js-ibmr-renderer

CameraCal
This is a camera calibration tool inspired by the toolbox for matlab. Give it a few checkerboard images, select some corners, and you get internal calibration parameters for your images.
Features:
- Output to xml/clb file
- Radial distortion
Windows binaries (source code) to come.
Accordion Hero
Last weekend, I spent some time making a prototype Accordion Hero that uses live input from a microphone, does Fourier analysis to determine the keys, and uses this to control the video game. The beauty of this is that you can use your own instrument and try to learn while playing a game.
http://www.youtube.com/watch?v=dm4Kv_-Sen0
The version is just a prototype. While debugging the audio input, I used Audacity (which has a beautiful set of frequency analysis tools). These were helpful in determining if it was possible. I ended up using the tools for the spectral analysis from Audacity (they have an internal FFT that is pretty lightweight and saves linking to some other external library, e.g., fftw3). Also, the portaudio library is great for getting audio input across several platforms. I used it without a hitch for linux, mac, and cross-compiled windows. I’m a fan!
Common issues include a bit of lag, and some noticeable bugs where it says you played a note before you played it (this is actually a minor issue that is easy to resolve).
I spent some of today building the windows version:
AccordionHero.zip
the windows version has some problems (namely, it crashes on exit). Use the .bat script to run. It may be missing mingw.dll (should be easy to find on the web).
And a mac version:
AccordionHero-mac.zip
I am not sure I have packaged all of the dependencies. Again, run with the .sh file. You may have to use dylib-bundler (or the other mac tool to rename the libraries reference by the binary).
I didn’t spend much time tweaking for different systems. You will have to make sure that the audio level on your input is high enough. Use the ‘f’ key in the program to bring up the frequency spectrum. This should have a horizontal bar across it. This is the threshold, below which everything is ignored. Use the .bat/.sh script to adjust this file (the vertical scale is roughly -90 to 0, the default threshold is -65 DB).
I have only tested this with the Accordion, but it should work with other instruments. Use the ‘f’ key to find the frequencies of your instrument. Edit the notes.txt file (which serves as calibration).
Here are some screenshots of the very lame gameplay:


MeldShape

MeldShape is another application for generating random shapes. Although, unlike JShape, which produces shapes in an algorithmic way, MeldShape takes an initial set of shapes and evolves them using differential equations.
Each shape has a measure of speed over the domain, and tries to fill in the entire domain without conflicting with other shapes. There is also a measure of how much a shape can vary from its original shape. The evolution is performed using an implicit level-set implementation. More technical details: meldshape
Below there are binaries for both windows and Mac. The Mac version will require you to download a recent version of the open source Qt libraries. Open up the application, and drag a set of seed shapes from JShape onto the window. Use the evolve button to start the evolution.

The concept for this project was initiated for Mat Bushell.
Some movies of evolution:
And an unedited (poor quality) movie of how to use MeldShape in combination with JShape: meldshape-usage
Interactive Virtual Materials

Interactive Virtual Materials
This is an implementation of M. Muller and M. Gross’s Interactive Virtual Materials (IVM). The paper is online: www.matthiasmueller.info/publications/GI2004.pdf. It is a method for simulating elastic and plastic virtual objects using the finite element method (FEM). A manifold geometry is coupled to a tetrahedral mesh that is used for the FEM simulation. An implicit method is used for simulation.
Changing Elastic Properties
It is fun playing around with the materials. The interface lets you add and remove springs to the objects. Changing the elastic modulus of the material has the most apparent effect. Low values gives a soft object and high values give a stiff object.
Some videos demonstrate the effects of these properties (videos: fingers.flv or fingers.mp4).

Changing Plasticity
Plastic objects will absorb and retain some of the energy during the deformation. The IVM simulation has three parameters (straight out of the paper) that determine how the object behaves. The plastic yield is like a threshold for when stress will be transferred to the object. Turning this to low values (with reasonable creep) will make the object act more like silly putty: stretching will result in a longer object that will hold its shape: snake_plastic_good.flv or snake_plastic_good.mp4
When the plasticity is implemented exactly as in the paper you get some neat animations. Reversing the sign fixed this problem. This guy could almost propel himself (snake_plastic.flv or snake_plastic.mp4).
![]()
Fracture
The fracture is straightforward for the tetrahedral mesh. Fracturing the bound mesh is a little more complicated, as you need to implement mesh operations to handle the intersection of triangles and retriangulation of holes. The original paper gives some details on this, enough to get started. In practice, there are a number of special cases that need to be handled (e.g., when a vertex lies exactly on a separating edge, which happens when multiple tets split apart). My implementation is only partially complete, and really only works for a few fractures. It has trouble classifying vertices that lie on tetrahedral edges to the correct side.
The sphere is a simple example of where fracture actually works. There are 5 tetrahedrons that enclose the sphere. Upon fracture, parts of the sphere break off (videos: sphere-crack.flv or sphere-crack.mp4)
A symptom of the problem is that triangles will be connected across broken tetrahedrons, giving stretched triangles (this also means that some of the holes may not have been triangulated properly). This is illustrated in the following example of a fracturing snake (my apologies for the modelling quality). The artifacts are apparent in the image below (videos: snake-crack.flv or snake-crack.mp4):
Downloads
I have built windows and Mac (Snow Leopard) executables.
- Mac: vertmat-0.1-mac.tar
- I haven’t tested on anothe rmachine, so some libraries may be missing
- You may need to resize the window if nothing is displayed (strange problem)
- Windows: vertmat-0.1.zip
There should be two executables: one built with glut, and another built with wx. In each case, navigation is done with the middle button (use the shift key to translate also). Left clicking will add a temporary spring to the object; press ctrl-c in the wx version (or just c in glut) to make the spring permanent. Start the simulation with “Ctrl+p” in wx (or from the menu), or use ‘s’ in glut (‘p’ will likely crash the glut versoin as it tries to load a previous set of fractures for debugging).
The source (vertmat-src-0.1.tar.gz) code relies on some of my internal libraries (so you won’t be able to compile it), but it may be interesting if you want to check it out the TetMesh class contains most of the IVM specific implementation; the TetBoundMesh class contains all the code for binding a mesh to the TetMesh.
Both programs read the “.ivm” files, which is really just the text serialization from boost. You can add your own objects by exporting the “.obj” files for a tetrahedral mesh containing the object, as well as the object as a .obj. To create the tet meshes you should probably have dupilcate vertices (so that both front and back-facing faces can be added to a mesh for opposing tets). The extra verts will be removed. Keep in mind that the bound mesh is attached on load and the implementation is a bit slow (so it may take some time to load). The ivm file can be created by copying one of the existing ones and replacing the references to the .obj files. There are some examples in this messy blender file: vertmat.blend . There are some scripts for creating a tetrahedral mesh from some verts (tetrahedralize and qhull), but they tend to create small tetrahedrons that the simulation will crap out on.
Movies
All of the movies are in this folder. They are in flv and mp4 to avoid any compatibility issues as they were screengrabbed with gstreamer.
History
Sometime in the fall of 2009, I was reading about wrinkle simulation in cloth and came across a paper that had cited the IVM paper. After looking at this paper, I realized that I was actually present at the talk at GI 2004. I think that there was no way I would have understood the paper at the time, but I am sure that I thought it was cool. This time around, I couldn’t let this paper get away. I decided to set aside some time one weekend to prototype an implementation–this first required taking out a book on FEM to fill in some of the blanks in the paper.
The base implementation of the tetrahedrons (not coupled to any geometry, and not including plasticity or fracture) is pretty simple. I finished up the mesh coupling sometime later and worked on the plasticity and fracture over the some time during christmas 2009. Unfortunately, the fracture of the attached mesh is incomplete. At the beginning I knew that this would pose some troubles, but I decided to go for it anyway–bad choice as I ended up wasting the better part of some days working on it. Some of the latter work was in-between christmas visits, and some was interrupted by tradesman checking out the water leak in our place.
The last bit was to port the UI to wxWidgets so others could play with the objects without the cryptic keystroke interface. Some strange GL canvas problems creeped in on the Mac side of things (which was slightly annoying, even though I have several working wx apps).
Still need to make some more interesting objects, handle self-collisions, and improve the rendering.
wtWidgets
Overview
This was my second attempt at a OpenGL UI toolkit (the first one being GWindows, used in the NES emulator). When I started, I was most concerned with adding animations, and how to interface with UI events. The events were handled using boost signals and slots, which is (in my opinion) the perfect way to implement UI events. The toolkit has customizable widgets (allowing for different fonts, backgrounds, and styles), as well as hooks for allowing animations to be attached. The toolkit has the typical windowing elements: windows, buttons (regular and check), menus, sliders, group boxes, layout managers, split panes, combo boxes, and text edits.
Most of the feel (of look and feel) is established by signals and slots. For example, upon creation a widget emits a look and feel signal, which allows for any slots (e.g., sounds or animations) to be attached to the widgets various UI signals (e.g., button pressed, window exiting, etc.). Backgrounds are controlled with textures and programmable shaders (old-school fragment programs that is).
Unfortunately, I wasn’t super concerned with usability, so laying out new widgets has to be done in code (and it is a little painful). The XML schema for styles could also use some work.
I have only used this code in a couple of projects. It is used in part of my Ph.D project for tracking humans (and one of the demos), and it is also coarsely integrated into the GT demo.
Styles
Here are a couple sample styles (follow links to view the movies: plain.flv style1.flv style2.flv).
 Style 2 (Aqua like) |
 Plane style |
 style1 |
|
Python Console

Part of the UI was developed in conjunction with a UI inferface to python (I call it PyCon; I realize this is also the name of a conference). The console allows commands to be issued from a command line prompt from within your program. All you have to do to use it is create the corresponding python wrappers for your classes (e.g., using boost::python, swig, sip, or whatever other tool you prefer. The low-level python console interface allows issuing commands (and auto-completing them). The UI is similar and wraps this low-level interface with a UI for issuing commands, displaying partial autocompleted results, scrolling through output, and remembering previously issued commands. I personally think that with the autocomplete, this is sometimes more useful than the actual python console.
Unfortunately, the python console will not work in windows (as it uses “dup” and “dup2” in order to grab the python interpreter stdin and stdout).
History
Although I can’t remember exactly what possessed me to start this project, I think it had something to do with seeing other nice interfaces (both in GL and for the desktop). One in particular was the original version of Beryl (or Desktop effects in Linux) that included the wobbly windows. I designed my own wobbly windows based on a spring network with cubic polynomial subdivision for rendering (wobbles: avi flv). This all started sometime around 2006, or 2007. See the source code (it may not be pretty: springs.cpp).

Gien
This is my collection of Graphics code. I wouldn’t call it an engine (mostly because it isn’t designed all that well). The code contains some rough implementations of BSP trees, skinning, shadows, some shaders, a particle engine, exporting from blender, and a coarse physics API (that uses either ODE or bullet). When I say rough, I mean rough. It is a little bit of spaghetti.
Anyway, with this project, I have created a bunch of sample demos. Maybe sometime I will release the demos, but they aren’t much.
Tic-Tac

Originally the code didn’t start out as a library. The tic-tac-toe example was my first motivation to try and re-arrange the code and get a library. Yeah, I know it is trivial. This example also uses my wt-widgets (another windowing initiative). Video: tictac.mp4
Shading/Effects
Some basic shaders. The latter example has reflections, and a simple agent that tries to throw cylinders at you. This second example grew out of a bunch of conflicting goals: wanting controllers to do things, having a walker with ground collision, integrating some of the effects (reflections, particles, normal maps), and to test the interface with the physics (getting notified of collisions, etc.). Unfortunately, there is no scripting yet. Videos: ocean.mp4 and effects.mp4.


Car
After integrating Bullet, I wanted to take advantage of some of the features. Of course, Bullet allows for cars, so this was my first attempt at creating a car demo. This demo also features a wt-widgets to change the settings. See the video: car.mp4

Walker
Just some testing of animations (and physics for rag-doll). The rag-doll bounding boxes are extracted automatically from the surface geometry (which is probably not the best solution). The degreess of freedoms for bones are extracted from the animation parameters so that appropriate joints can be assigned (again, for physics back-ends, this is done for both ODE and Bullet). Videos: walker.mp4 and physics.mp4


Radiosity
This is a hemi-cube based radiosity implementation. My implementation starts out by rendering to the hemi-cube for each element (which starts out as a face). After a few iterations the rendering is then done for each texel (at a low resolution), and then resolution is increased. I also included a rotation around the normal of the surface point (by various amounts) to reduce any aliasing. My intention was to use this to generate textures, but I never did. After a hard disk crash I lost this model as well. It is a model of our condo: rad.mp4


History
A number of years ago I was staying at my parents place, watching their dog while they were visiting England. In the past I had a collection of graphics routines (for other vision related projects), but while I was visiting my parents I wanted to play around with graphics again. During that week, I started playing around with billboards and scripting in Blender (I’m not sure what came first, the GT racer game, or this collection of code). This mostly poorly structured collection of code turned into more poorly structured code, and a testing place for more code.
(non)-rigid tracking
In the past little while I have been trying to determine a way that dense geometric deformations can be reconstructed and tracked over time from a vision system. The main application is to track dense geometry deformations of a human subject over time so that they can be played back under novel view and animation conditions.
It is assumed there are only a few cameras (with known pose calibration) observing the scene, so it is desirable to take advantage of as much temporal information as possible during the reconstruction. As a simpler starting point for this problem, I felt it appropriate to work on the reconstruction of dense geometry for a moving human head.
Many existing tracking methods start with some known dense geometry, or assume that the geometry can be reconstructed at each time instant. In our case, neither of these assumptions hold, the latter because we have only a few cameras. The general problem is therefore to reconstruct a dense model, and its deformations over time.
A part of the problem is to reconstruct the motion of the rigid parts. This can be done using all available cues, e.g., texture and stereo. And it too can be accomplished with different representations (e.g., a set of points, a mesh, or level-sets). In these notes, I considered this problem alone: given an approximate surface representation for a non-rigid object, find the transformations of the surface over time that best agree with the input images. Keep in mind, however, that these ideas are motivated by the bigger problem, where we would like to refine the surface over time.
In this example, intensity color difference (SSD) tracking was used to track a skinned model observed from several camera views. The implementation is relatively slow (roughly 1 frame a second), but I have also implemented a GPU version that is almost 7 fps (for 12000 points and two bones, one 6.dof base/shoulders and a 3 dof neck, with 4 cameras).
There is a pdf document with more details posted as well.
Some videos are given below.
An example input sequence. The video was captured from 4 synchronized and calibrated cameras positioned around my head.
If we just run a standard stereo algorithm, we will get some noisy results. Ideally we would like to track the head over time and integrate this sort of stereo information in the coordinate frame of the head. This part is hard as the surface is open.
Tracking the head alone would allow the registration of these stereo results in a common coordinate frame, where temporal coherency makes more sense. The video below demonstrates this idea, although I haven’t found a good solution for merging the stereo data.
| Tracked head | Depth registered in coordinate frame of head |
The following videos are more related to the tracking using a skinned mesh and an SSD score. In the following videos the tracked result on the above input sequence using a mesh generated from the first frame is illustrated below. The mesh has two bones: one 6 D.O.F for the shoulders and another for the 3 D.O.F. neck/head.
The tracking currently ignores visibility; this can cause problems when many of the points are not visible. An example of this mode of failure is given in the following sequence. This sequence was captured under similar conditions, although the left-right motion is more dramatic (more vertices are occluded). Additionally, this sequence has some non-rigid motion.
| Input sequence | noisy depth from stereo |
| Tracked head and shoulders. Notice the failure when the head is turned too far to the left. | |
These videos, and the original avi’s are available in the following two directories:
seq0-movies and seq1-movies. You will need vlc, or mplayer, ffmpeg, (maybe divx will work) to view the avi’s.
Code for Rodrigues’ derivatives: roddie. Included as I merged this code into my articulated body joint.
MCap
Capture from multiple libdc1394 /firewire cameras on different hosts. Each host can have several cameras. The library bases the multi-host communication on the pvm library. Higher level classes are used to develop the UI (Qt)
Mode of operation assumes that recorded files will be sent back and used in post processing. Files can be encoded on the client side (using mencoder) and then transferred back, or saved in a raw binary form for transfer after. Alternatively, for short sequences, or when the disk or encoding is a bottleneck, the client side saves images in memory buffers and transfers them after the recording is complete. Raw files from multiples hosts are merged and can be viewed with a simple multi-video viewer. File transfer is done with a combination of scp/ssh and TCP/IP sockets; as such it will probably take some effort to port to windows.
MCap supports changing features and settings, or loading configurations of cameras from files (in a crude manner).

Issues: changing video modes sometimes causes failures (possibly due to trying to allocate more bandwidth than the1394 bus can handle). Failure is painful due to
Planned (Maybe): add ability to plugin framesinks (for transfer, encoding), or other filters and processing so the client can do processing in real-time applications.
To come: possibly a system architecture, source code, and some videos.
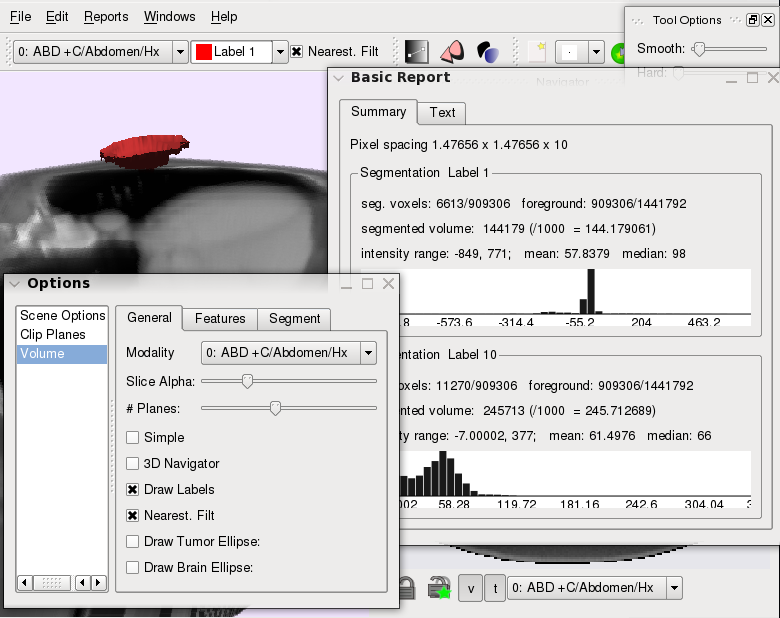
Segmentation Tool
Posted by in Projects on April 22nd, 2009
Overview
The segmentation tool started as a simple 3D segmentation
viewer with crude interaction to inspect the results of
an automatic level-set variational segmentation. Since then
several semi-automatic intelligent tools have been incorported
into the viewer. These tools take the region statistics from a
user selection and try to intellgently dileneate the boundary
of the users selection; these allow a user to roughly specify the
region of interest (be it some anatomical part, or a tumor),
while the software takes care of extracting the boundary.
The tool is currently in a beta stage, but has been used in our
lab to perform segmentations for several research projects. Possibly,
in the future, it will be open-sourced.
Features
- Multiple segmentation layers
- Semi-automatic interactive tools (graph-cut based)
- Different region statistics modes (histograms, independent histograms, mean)
- Slice-locking fixes segmentation on a slice; also ensure 3D automatic tools do not interfere with user segmentations
- Plugin-based interaction tools
- 3D-view, multiple 2D views (with different image modalities).
- Dicom loading (using gdcm library)
- Cross-platform (Linux/Windows, probably Mac)
Screenshots

Contributors
Neil Birkbeck, Howard Chung, Dana Cobzas.
Proving Ground
The tool also serves as a proving ground for other semi-automatic segmentations. In an attempt to improve
the segmentation when a prior shape was known (for example, a mean shape from previous segmentations), an extension was developed to perform an optimization over shape deformation (rigid transformations + non-rigid transformations) while keeping the resulting segmentation close to the mean shape. Below are some of the videos related to the implementation of this idea (a short presentation, with no references, is also available: levprior.pdf).
The video links illustrate a selection (which mimicks the mean shape), followed by the optimization of the segmentation (hardness_mid.mp4/ hardness_mid.flv, varying_hardness.mp4/ varying_hardness.flv). The hardness parameter determines how close the segmentation is to the mean shape. The interp video ( interp.mp4/ interp.flv) shows how a single mean shape can carry over to different slices. Ideally this would be done in 3D with a fixed 3D mean shape. Finally, with this model it is easy to introduce more user constraints in the form of point constraints (point_cons.mp4/point_cons.flv).
Passive Walker
Posted by in Projects on March 28th, 2009
In the past week (late March 2009), I kept coming across the same paper (by Brubaker et al.) that used an anthropometric passive walker for a prior in people tracking. I had read the paper in the past, but this time I couldn’t contain the urge to implement some of the ideas. This is the result of that impulse.
The passive walker contains a spring in between the hips and has a parameter for the impulse recieved on collision. From these two parameters you can generate different styles of walking; you end up with the ability to generate cyclic gaits for different speeds and stride lengths. The walker only has two straight legs, but Brubaker suggests a method to map this to a kinematic structure. The screenshot below shows several walkers attached to a kinematic structure and skinned mesh.anim

It is better illustrated in the movie, in which I am controlling the speed/step size of the gait by the mouse movements:
The movies (passive.mp4, passive.flv)
I spent about an hour throwing together something that tried to pose the rest of a mesh using the walk cycle. The idea was to use a training set of poses (from motion capture data), and pick poses for the upper body from the training sequence based on the orientation fo the lower joints. I’m sure it could be done better. Below are some examples: the left hand side shows some poor resutlts (due to overconstrained joint angles); the right side shows unposed upper body. Some of these sequences are avaibale to use (anims) with the viewer on the wxshow page.

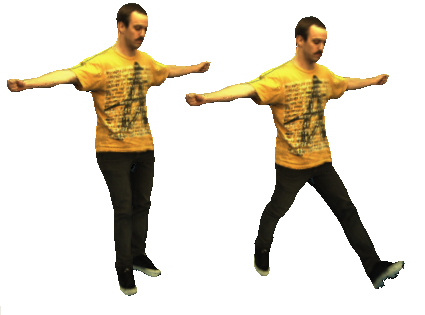
A document containing some of my implementation details:passive.pdf
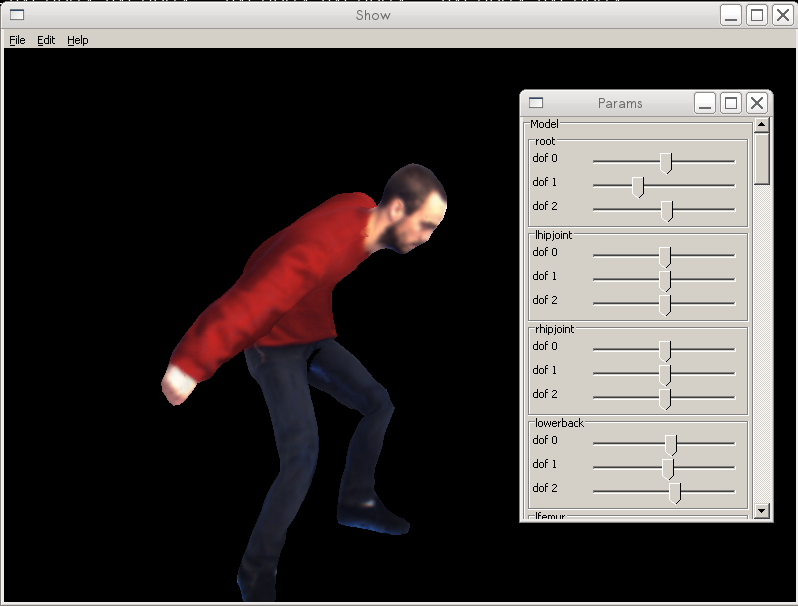
ispace viewer (inm)
Posted by in Projects on March 9th, 2009
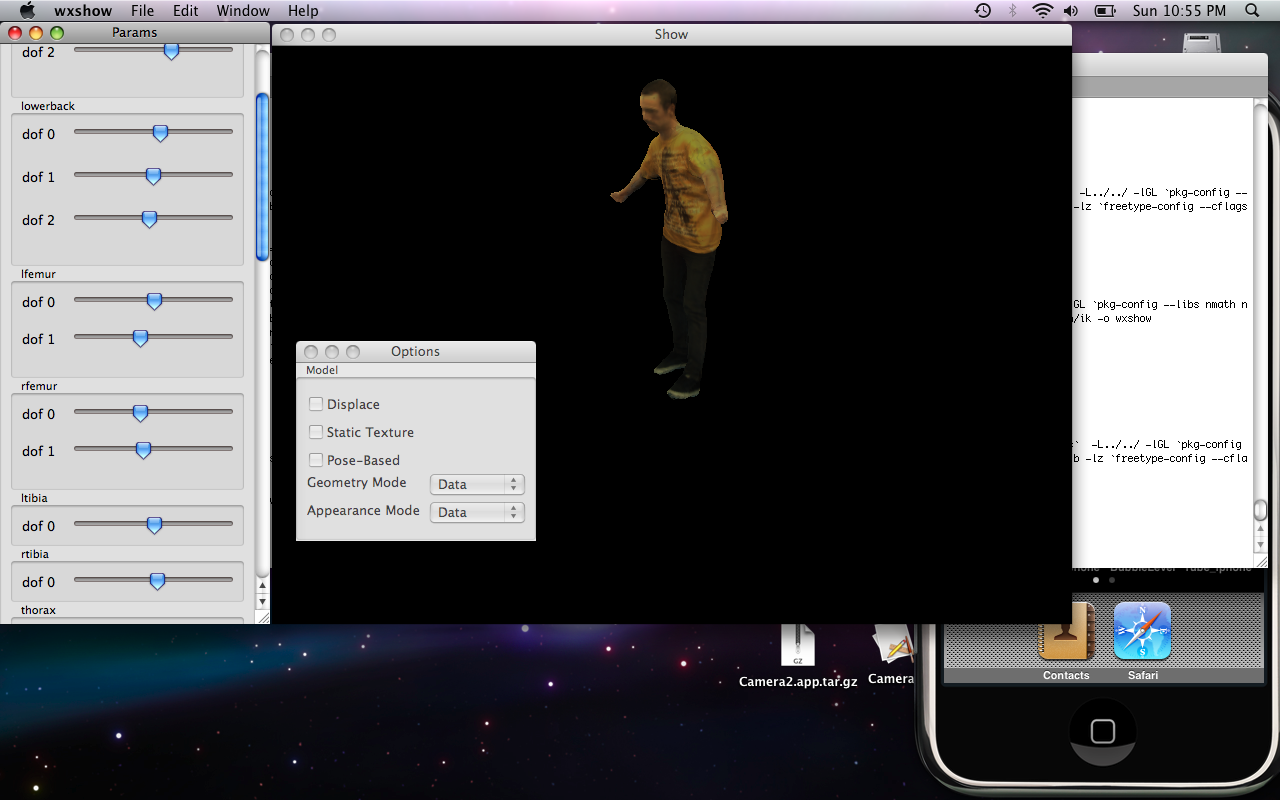
This is a cross-platform viewer for inspecting and playing with the parameters of my shape/appearance interpolation files (inm).
I originally created this to allow viewing of the models that I create in my research. It is in a preliminary state, but can currently be used to render captured animations on a model, while demonstrating geometry deformations and view-dependent appearance.
Files (let me know if there are any problems):
Models:
Status:
- This is an Alpha release (Mar 9)
Problems:
- Crash on exit (Mac)
- MIME types (Mac/Windows)
- Status-bar for loading
- Temporary file cleanup
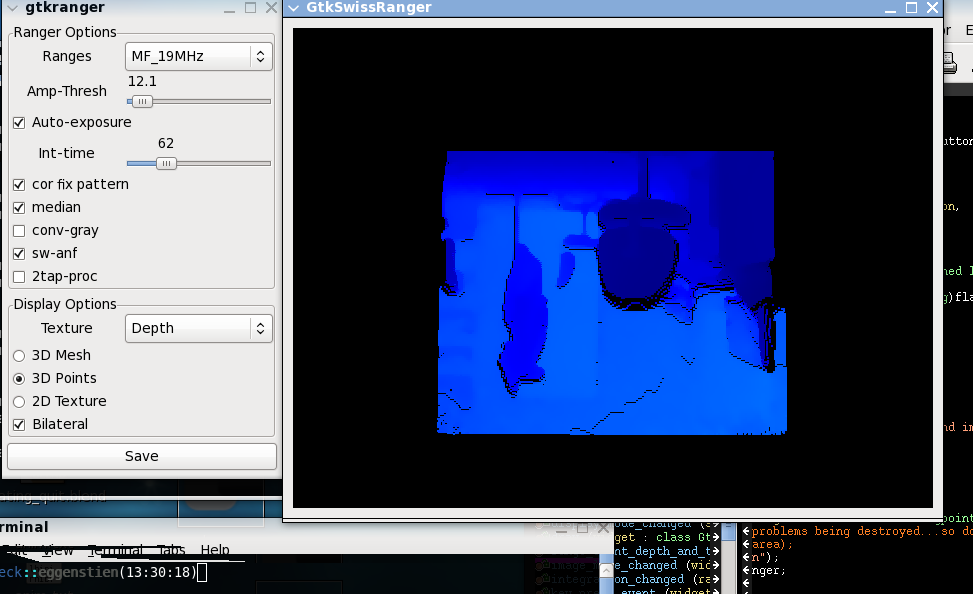
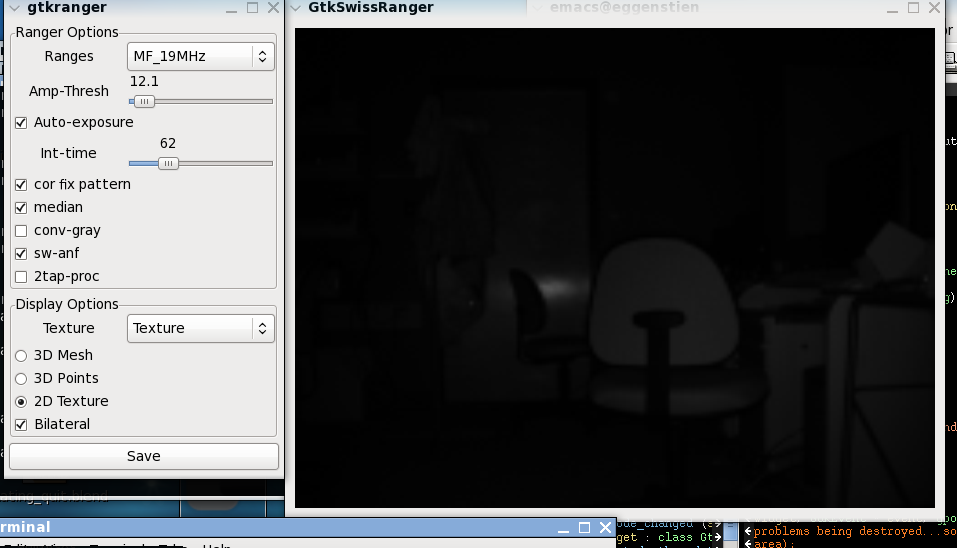
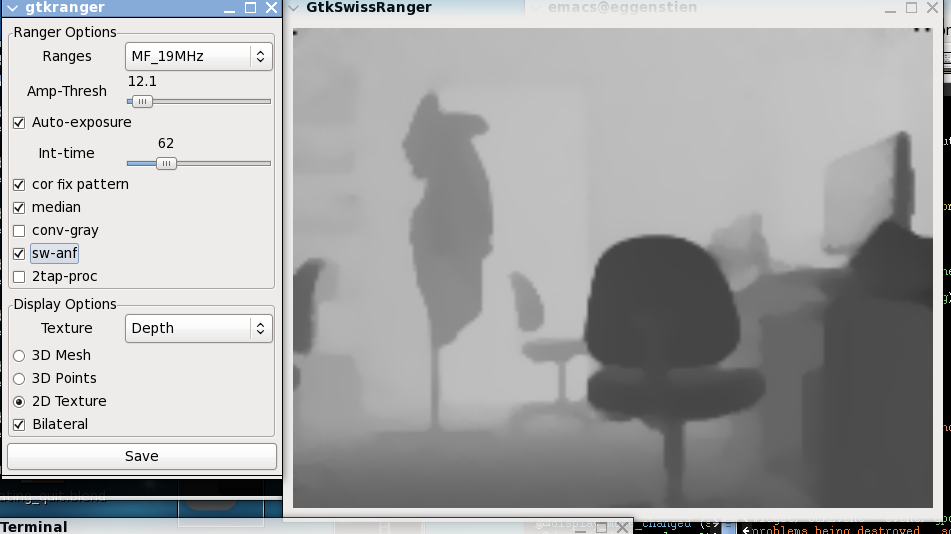
Swiss Ranger
gtk swiss-ranger
We reciently got a SR3K Swiss Ranger time of flight range finder. After trying to get some data out of thing (their API is really straightforward), I realized I was going to need something similar to their windows API (provided with the developer kit) to probe all the available parameters.
This code is the result of that work. It is not much, but gives a way to try out
the device using c/c++ in Linux. I realize that they provide sample code for python (and matlab), but there were some problems getting that to run out of the box (mostly because the drivers are 32-bit, meaning that the python interpreter has to be 32-bit, and I didn’t have a 32-bit version installed.)
After all of this, I think that the best settings are the following: AutoExposure on (with a desiredPos of about 50); Median Fitler on, AN-SWF on (whatever this is), and a extra bilateral sw filtering (my own).
The screenshots below show the contrl window and some of the display modes.

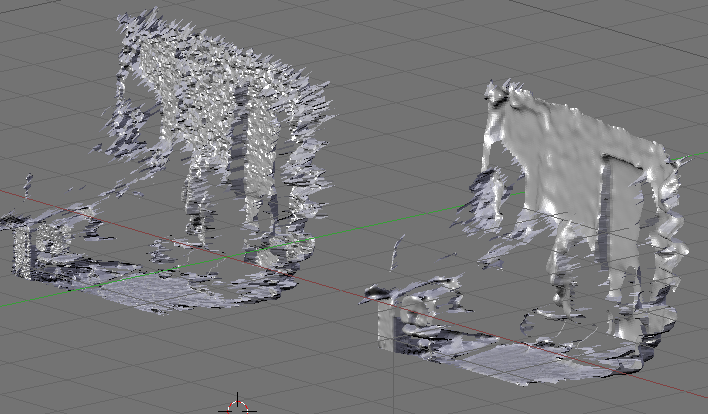
To illustrate the noiseness of the data (after only median filtering) is displayed in the blender
screenshot below. This is compared to the right image with the extra AN-SWF and bilateral filtering.
Source is also available. Requires nimage to build, but the binary should probably work as long as 32-bit versions of gtkgl-2.0 and gtk+-2.0 are installed.
Python
Posted by in Projects on November 29th, 2008
Blender scripts:
- blender_cams.py
Initialize a bunch of cameras around an object. - blenvis.py Some utils for saving our file format of camera parameters or inserting an animated camera viewing an object.
-
blender_render.py
Render animation or multi-camera scene in blender (you will need to edit this), but it may serve as an example of how to output from blender.
Python test proggies:
- largest_sub.py: dynamic programming to compute the largest common subsequence. Just playing around with some programming contest problems.
- kpop.py A friend had mentioned this problem to me. Given n variables, x_i, each of which can take on some set of values {a_ij}, j in m_i, generate all possible combinations of the variables. I suggested that recursion was the easiest way to do it. He said it wasn’t. I tried out both solutions.
Chi-Puzzle
Posted by in Projects on November 10th, 2008
Super chi-puzzle. Features to be listed (if I every finish)
Broken Glass
Posted by in Projects on November 10th, 2008
Simulate broken glass on the iPod touch screen. Thought this would be a neat little app, so I spent a couple hours working on it and tried to sell it on the app store. After a long review period Apple denied it. Oh well.
Might as well upload the source code. It just simulates the break randomly by creating fracture lines and stopping fractures when other intersections are encountered.
Sliles
Posted by in Projects on November 10th, 2008
A small sliding tile iPhone app. Play up to the 6×6 puzzle. Use your own image for the tiles, or remove the numbers for the tiles. App also saves the state of your game, so you can close and resume playing at a later time. Also keeps track of how many games played to date, and how many you finished or aborted.
This project was co-authored by Stephen Eliuk. Search the App store for Sliles Tile Puzzle…and buy it!.
Windows Jumble Solver
Posted by in Projects on October 16th, 2008
I used to play Jumble in the morning (you know, the word game?) with my Grandma. This was a while back, and at the time I was tired of getting stuck on some of the puzzles and decided to write some code to solve it for me. This was the result.

Legacy
Posted by in Projects on October 15th, 2008
I finally got around to pulling out some old code for test apps that I had written some years ago.
Arkanoid
First one is arkanoid (break-out):
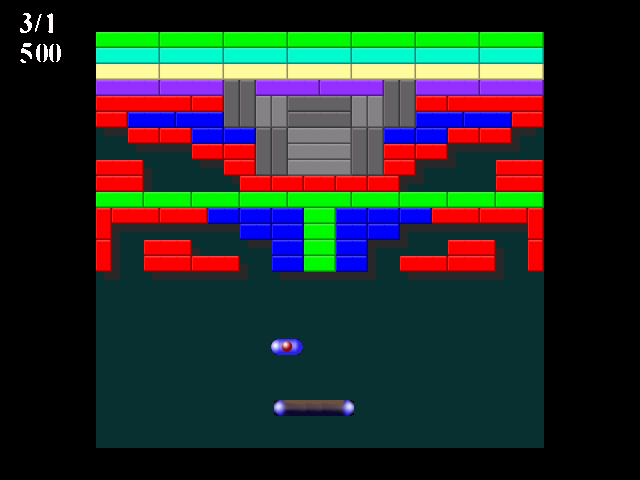
I miss living with my parents and working at a dead end job. It gave me motivation to work on little things like this. At the time I believe I was in my third year of my undergrad degree and it was either Christmas holidays or spring break. I had just finished spraining my thumb to the point where it had dislocated and the bone came through the skin. I started working on this gem and probably only spent maybe a day or two on it. Obviously never finished but it still may be fun to play. Download the windows binary (doesn’t work in wine) and try it out.
Bomberman
Next on the list is of course Bomberman. I still have some hidden obsession with bomberman. In this case, I totally ripped off the icons for the bomberman from the game, but I remember creating the textures for the fire (and most likely the board). This piece of work features randomly generated levels, partial multi-player support, mp3 player support (not sure how to use it anymore, using fmod sound). And of course some crappy AI. When I started this project (some time in the summer of 2002), I was interested in the AI for the game. The method I implemented used a strategy where the agent keeps track of the utility of places where a bomb will explode and ignores these positions while trying to break as many bricks. He is not much of an opponent as his primary goal is to destroy the bricks, but it was fun playing around with nonetheless. Thanks to Nathan Matthews for making a title screen:

See some of the screenshots below. If you try it out, make sure that you select player1 as keyboard1 and player2 as AI. Use ‘a’, ‘w’, ‘s’, and ‘d’ to move the player; ‘z’ to drop bombs, and ‘x’ to kick/detonate when you have a special.
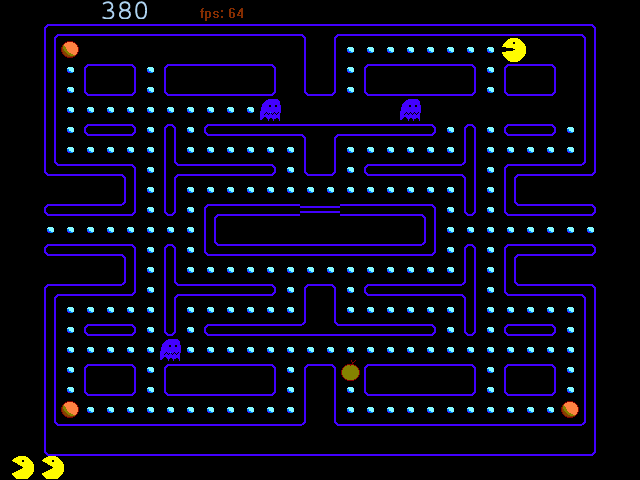
Pacman
Not too much interesting with this one. Sounds real, I guess. The textures of the tiles are dependent on the underlying board, which is kind of neat I guess. The space key will chomp through the walls, so you can see what I mean. I can’t remember exactly when this project was concieved, but I would have to guess around christmas time.
tile world
Posted by in Projects on August 10th, 2008
Contract work. A simple environment (search the web) for agents to learn in.
The core functionality was implemented, but to my knowledge no learning agents were actually implemented in the environment.
More details, and potentially source to come.
-
You are currently browsing the archives for the Projects category.
Latest Movies


Random Movies